How To Add Visual Regression Testing To Web Apps
Percy and GitHub Actions
Published on 2019-11-6
Visual Regression Testing is one of the most underutilized ways to avoid bugs in production. They can add immense value for very little effort. A quick Google search shows that there are 8x more search results for "unit testing" than for "visual regression testing." I believe a big reason for the discrepancy is that Visual Regression Testing has traditionally been harder to set up and get right. Today I want to show you that this doesn't have to be the case. This article will walk you through setting up continuous Visual Regression Tests for web applications.
What we're going to build
Our goal is to be notified of visual changes to our application before they make it into production. The workflow described in this article assumes that you're using pull requests to add features to your web application. We are going to add a GitHub check which notifies us whenever the UI would change as the result of merging a pull request. Every visual change has to get approved by a team member in order for the pull request to pass.

When we click the "Details" link we'll be taken to Percy. Percy is a service we can use to run our Visual Regression Tests. We are able to see what caused the regression there. In this case the subtitle shrunk accidentaly. Luckily our Visual Regression Test caught it!
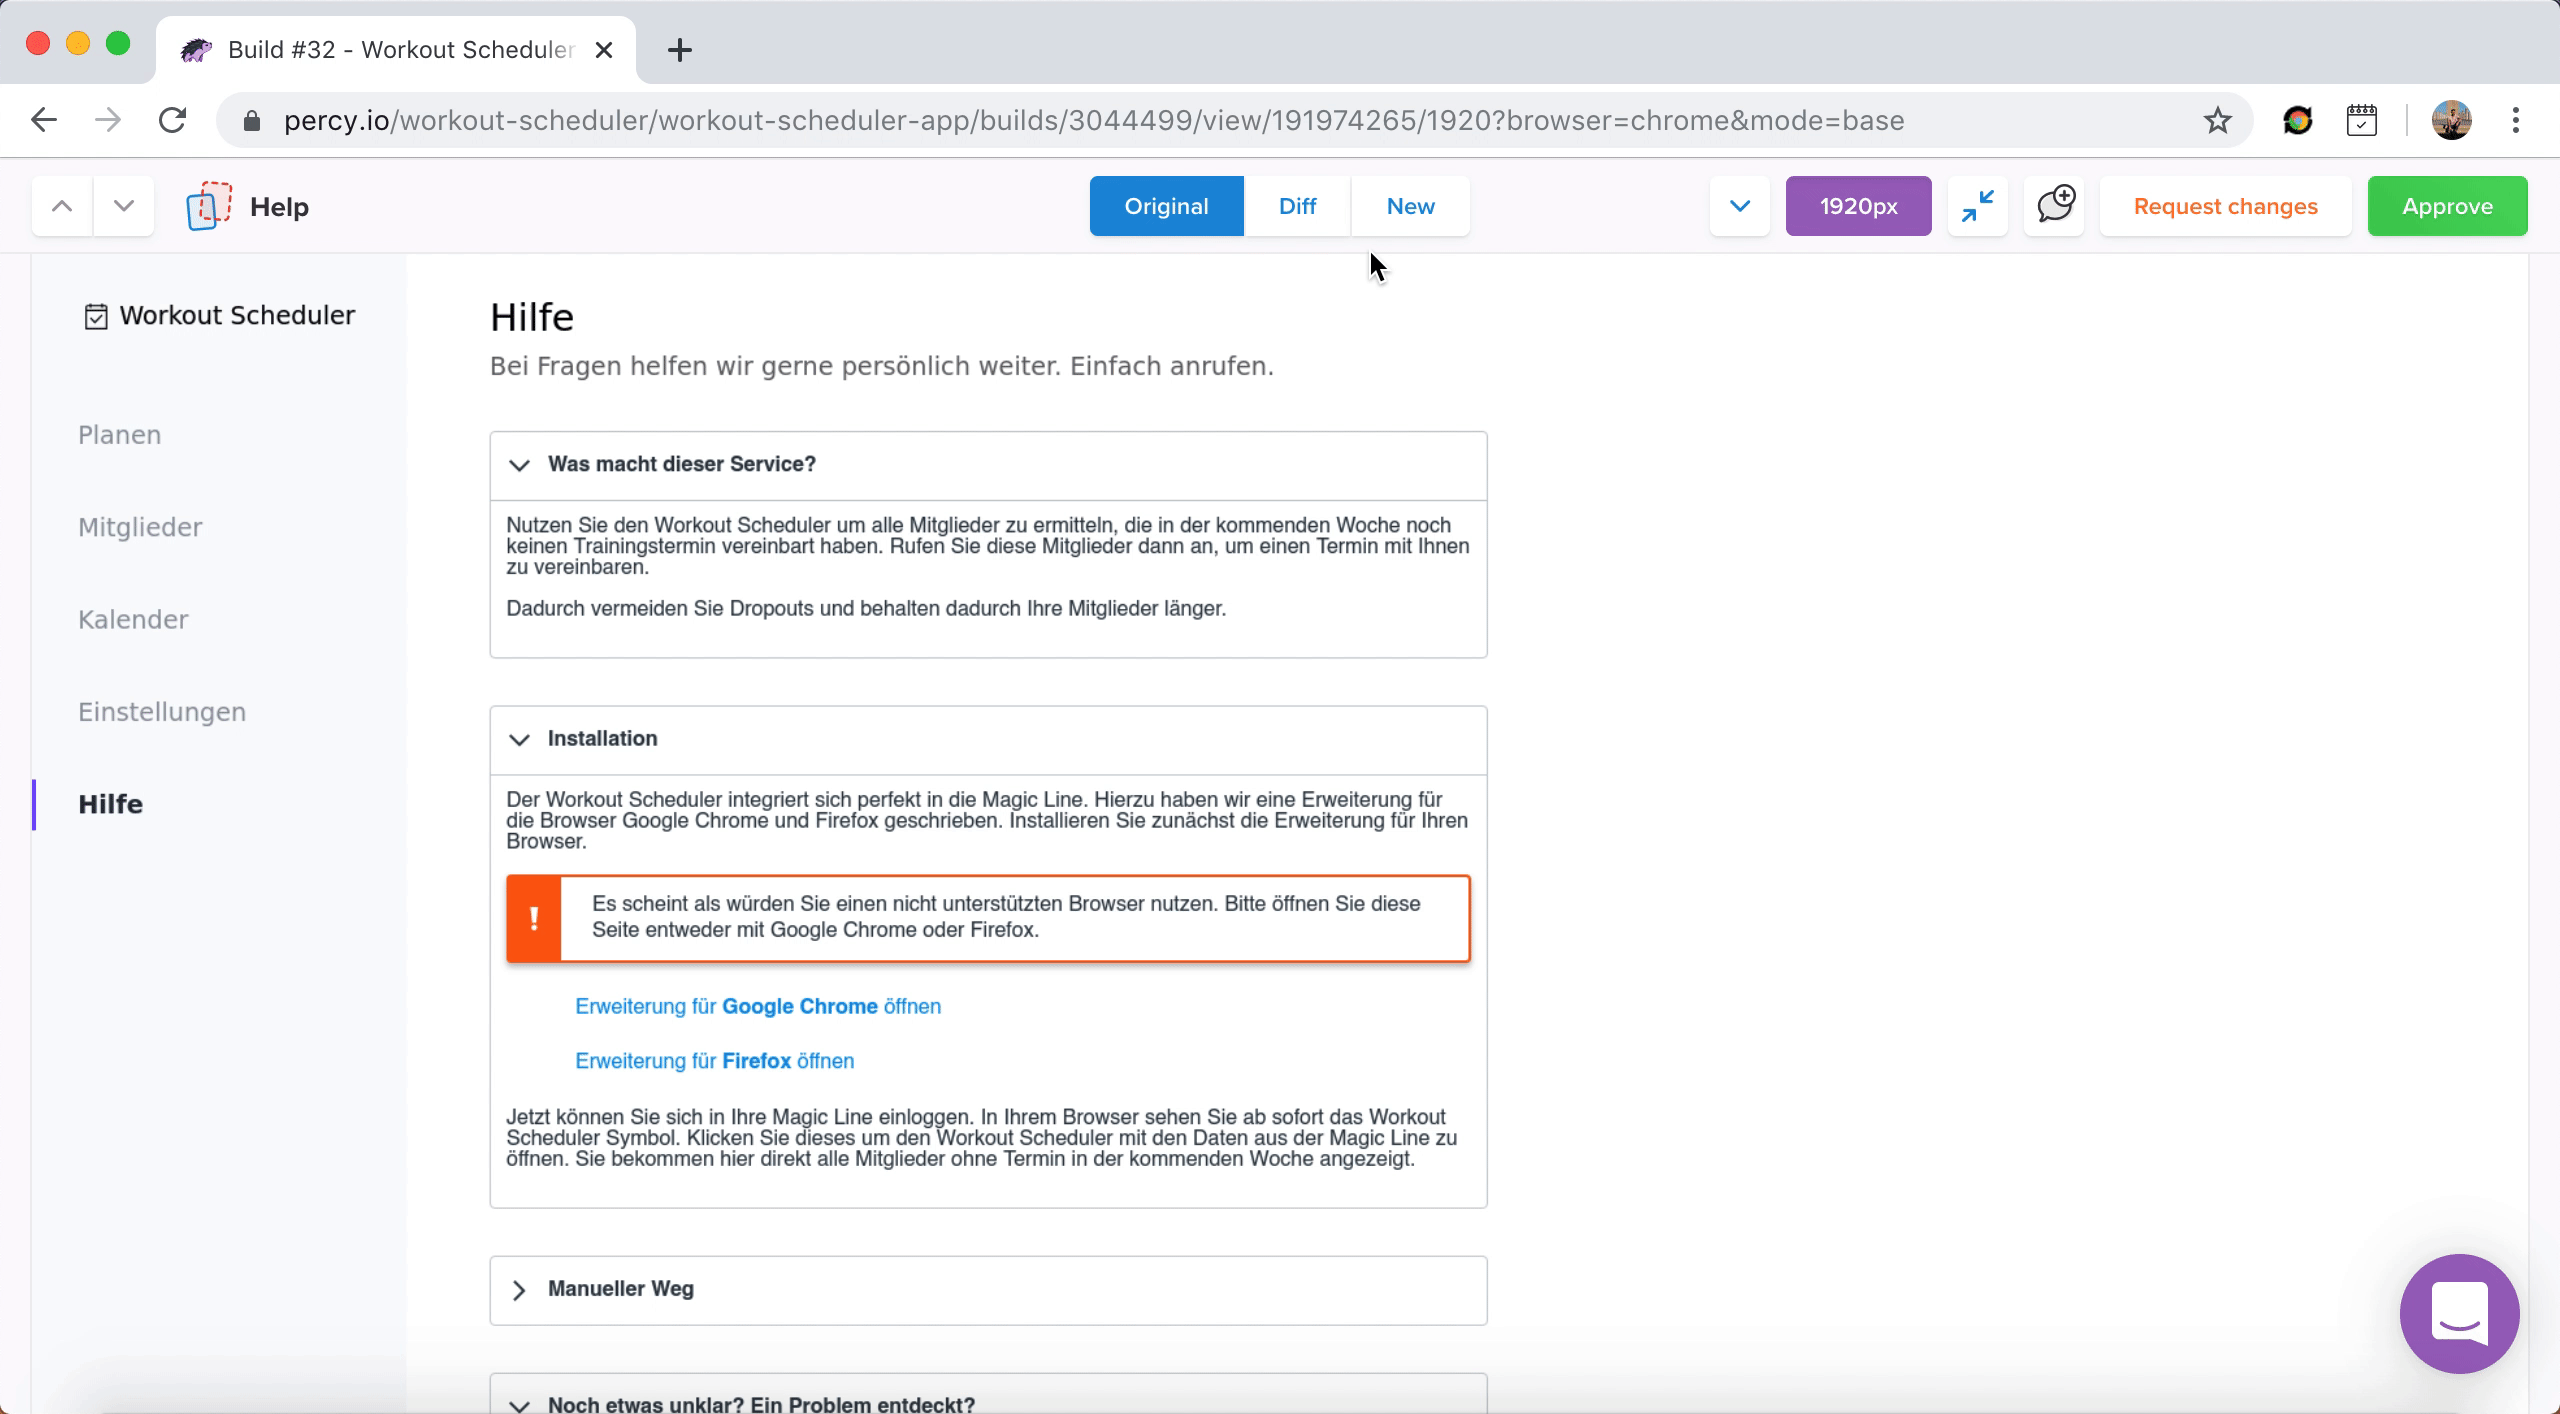
You can use the green "Approve" button on the top right of Percy's UI in cases where you made the change on purpose. This will then also turn the GitHub check green and thus mark the PR ready to be merged. PRs with no visual differences will be approved automatically.
Every visual change has to be reviewed. This uncovers and prevents accidental changes. Things you changed on purpose must be approved explicitly. We've now seen how Visual Regression Testing prevents visual bugs from making their way into production.
What we need to achieve
We need to make it possible for the CI service to build our application, run it and take snapshots of it. The CI service needs to serve the application locally. Percy can then visit the different pages of our application and take screenshots along the way. Since we'll use Puppeteer we can even get the application in the desired state by performing actions as a user would, before taking screenshots with Percy.
The Visual Regression Tests will run against the production build as that is what our users are going to see.
Whenever a PR is opened, we'll kick off a separate GitHub check which will inspect the PR for visual regressions. This GitHub check will run in parallel to your existing CI checks, in a separate environment.
How to set up Visual Regression Testing
This section will explain how to set up Visual Regression Testing with react, jest and puppeteer using GitHub, GitHub Actions and Percy.
I chose these technologies as they're fairly popular. The principles apply to other libraries, CI services and test runners as well though.
I'm certain you could make the same work with Vue, Angular or vanilla JS applications on CircleCI with Gitlab.
The setup we're about to create will be free, even for private repositories. This allows you to test things out and follow along.
I'll assume basic knowledge and skim over the parts which aren't directly related to Visual Regression Testing (VRT).
Preparation
You'll need a GitHub repository which contains a React application. If you want to follow along, I recommend creating a new repository and initializing it with a create-react-app application.
You'll further need an account for Percy. They have a reasonabliy sized free tier containing more than enough space to follow this tutorial.
Applications built with create-react-app come with Jest as their test runner. If you're not using jest yet, add it to your project.
Make sure to connect Percy to your repository so that it can attach its custom GitHub checks to your repository.
Adding the setup
Let's get this out of the way. We'll configure them all afterwards.
yarn add @percy/puppeteer puppeteer serve dotenv
package.json
Let's start where your CI test will start. We'll later configure our CI to run yarn test:visuals.
First we'll provide this script by adding it to package.json's scripts section.
{
  "scripts": {
    "test:visuals": "percy exec -- jest --config integration/jest.config.js"
  }
}
This script uses two things: percy and jest. Let's add configurations for both.
percy.yml
Percy can read its configuration from different sources. We'll go with a percy.yml file at the root of our project folder.
# percy.yml
version: 1
snapshot:
  widths: [1920]
The widths entry contains an array of screen widths Percy should take screenshots at.
I limited it to one screen size as the application I'm testing for is a B2B web app which is only accessed from desktops.
For your project, you should probably set it to a mobile and a desktop width. Or you can remove it and use Percy's defaults.
integration/jest.config.js
The second thing test:visuals kicks of is jest --config integration/jest.config.js.
This starts jest with the config located in integration/jest.config.js. Let's create this configuration file now:
// integration/jest.config.js
module.exports = {
  preset: "jest-puppeteer",
  testRegex: "./*\\.test\\.js$",
};
The config file registers jest-puppeteer and tells jest to run all files ending in .test.js in the current directory called integrations.
jest-puppeteer.config.js
The previous step registered jest-puppeteer. Let's add a configuration for jest-puppeteer as well.
We tell jest-puppeteer how to start our application, and when to consider it ready to accept requests.
As the example application can be served statically, we only need to serve the build folder.
We'll use the serve package we previously installed to do so with yarn serve build -p 5000 as our command.
// Load the percy token from `.env` when testing locally.
// This is not used when running in CI.
// See below for the ".env" contents.
require("dotenv").config();

module.exports = {
  server: {
    // This starts the application by serving the built appliation.
    // It serves the "build" folder on port 5000.
    // If your web application needs a backend, you could kick off a fake
    // backend here too.
    command: "yarn serve build -p 5000",
    // The protocol, host and port are used to check when your application
    // is ready to accept requests. Your tests will start running as soon as
    // the port on that host and protocol are available.
    protocol: "http",
    host: "localhost",
    port: 5000,
    // When the port at that host and protocol does not respond within the
    // specified time, the tests will fail. Increase this time (in ms) in case
    // your application requires more time to boot.
    launchTimeout: 15000,
    debug: true,
  },
};
.env
You might have noticed require("dotenv").config() in the previous step.
This is used to load the contents of .env when running the Visual Regression Tests locally.
We need to populate our PERCY_TOKEN here to enable running Percy on your development machine.
# .env at the root of your project
# This file and token are loaded by dotenv in jest-puppeteer.config.js.
# That way the percy token will be defined when testing locally.
PERCY_TOKEN=xxxx
Make sure to ignore this file in git by adding it to .gitignore.
Adding the first test
Now the setup is completed and we're ready to write our first actual test.
We need to contain all our visual tests within the integration folder.
You can create as many files ending in .test.js there.
integration/app.test.js
This test will load the page from http://localhost:5000/help, assert that the
"Help" text is present and take a screenshot.
Notice that the application is already started (on port 5000) thanks to jest-puppeteer.
That library conveniently populates a page holding a puppeteer page we can use in our tests.
const { percySnapshot } = require("@percy/puppeteer");

describe("app", () => {
  beforeEach(async () => {
    await page.goto("http://localhost:5000/help");
  });

  it("should display the help page", async () => {
    // This is here to show that you can even run regular assertions
    await expect(page).toMatch("Help");
    // This instructs Percy to take a screenshot at the current state, sends it
    // to Percy's servers and compares it with the existing screenshot to
    // check for visual regressions.
    // Make sure the second argument is a unique name for this situation
    await percySnapshot(page, "Help");
  });
});
Testing locally
We're now ready to kick off a test run locally.
Build your application with yarn build.
Then serve the result with yarn serve build -p 5000.
This needs to be done manually when testing locally. We'll automate this in the CI step later on.
You should now be able to open http://localhost:5000/ and see your application running locally.
This is what your Visual Regression Tests will run against.
To kick off a run locally, execute yarn test:visuals.
This will run your test suite along with Percy and Puppeteer.
The created screenshots will get uploaded to Percy and you can view them there.
The link to do so is printed to the console.
Automating the tests with CI
We'll set up a GitHub action which runs on every pull request and whenever a push to the master branch happens.
Execuing percy on pushes to master will allow us to keep the baseline up to date.
Percy will contain the snapshots from branches to the baseline snapshots from the master branch.
Executing pery on pull requests allows us to see whether they would introduce visual regressions or not.
Add the PERCY_TOKEN as a secret
You'll first need to set PERCY_TOKEN as a secret in GitHub.
Navigate to your GitHub project, then click to Settings > Secrets and add a new secret called PERCY_TOKEN.
visual-regression-testing.yml
Now it's time to create a GitHub action which will run on every pull request and on pushes to master. You can copy-paste the configuration below.
name: Visual Regression Tests

# Run this GitHub action on pushes to master and on any pull request.
# It needs to run on master to determine the baseline.
# It needs to run on pull_requests to detect eventual visual regressions.
on:
  push:
    branches:
      - master
  pull_request:

jobs:
  build:
    runs-on: ubuntu-latest

    strategy:
      matrix:
        node-version: [12.x]

    steps:
      # Checks out the code
      - uses: actions/checkout@v1
      # Sets up node v12
      - name: Use Node.js ${{ matrix.node-version }}
        uses: actions/setup-node@v1
        with:
          node-version: ${{ matrix.node-version }}
      # Tries to restore the yarn cache to speed up "yarn install".
      # This step also persists the cache later in case the run was successful.
      - uses: actions/cache@v1
        with:
          path: ~/.cache/yarn
          key: ${{ runner.os }}-yarn-${{ hashFiles(format('{0}{1}', github.workspace, '/yarn.lock')) }}
          restore-keys: |
            ${{ runner.os }}-yarn-
      # Install dependencies
      - name: install
        run: yarn
      # Build the application.
      # Note that you can provide whichever env variables you need.
      # If they contain sensitive information, you can create GitHub secrets
      # and access them through ${{ secrets.YOUR_ENV_NAME }}
      - name: build
        run: yarn build
        env:
          CI: true
          PRODUCTION: true
      # This step runs the visual regression tests
      - name: test
        run: yarn test:visuals
        env:
          CI: true
          PERCY_TOKEN: ${{ secrets.PERCY_TOKEN }}
          # These settings here are to make percy aware of the context/PR it is
          # run in. This helps them determine the baseline to your diffs.
          # They would likley not be necessary anymore once Percy offers their
          # own GitHub action.
          PERCY_COMMIT: ${{ github.sha }}
          # github.head_ref is only defined on pull requests
          # When the type is not a PR it must be a push. We can then read
          # the ref from github.event.ref, which most likely contains "refs/heads/master"
          # So we would have PERCY_BRANCH: ${{ github.head_ref || github.event.ref }}
          # But Percy expects just the string "master" without the /ref/heads prefix.
          # That's why it has to be hardcoded. This is okay, since regular pushes are
          # only happening on master and everything else must be a PR.
          PERCY_BRANCH: ${{ github.head_ref || 'master' }}
          # This only defined on pull_request's too.
          PERCY_PULL_REQUEST: ${{ github.event.number }}
At the moment the last step in the configuration is a bit excessive.
Percy does not yet provide a GitHub actions integration so we need to populate some environment variables for it during the run.
I spoke with their support team and they are going to improve this soon.
Try it out
You should now be able to see Percy in action after you open a PR with a visual change. After opening a PR you'll see a GitHub check for the GitHub action. The action checks your application out, starts it and then runs your integration tests against it. It takes screenshots along the way and sends them to Percy to check for differences. Once Percy determined the differences it will attach its own GitHub check status to your PR.
In case it detected changes you'll be able to accept them in Percy and Percy's check will turn green.
Tip
You could use pptr-testing-library to prepare the state of your application before taking snapshots. It gives you an API similar to what you might already know from @testing-library/react.
Test on!
I hope this article was able to shine some light on how you can set up and benefit from Visual Regression Testing in your own application. I'm glad to try to answer any questions you might have on Twitter where I'm known as @dferber90. You can also follow me for future articles there. If this helped you, I'd be glad to hear about it on Twitter too. Happy testing!